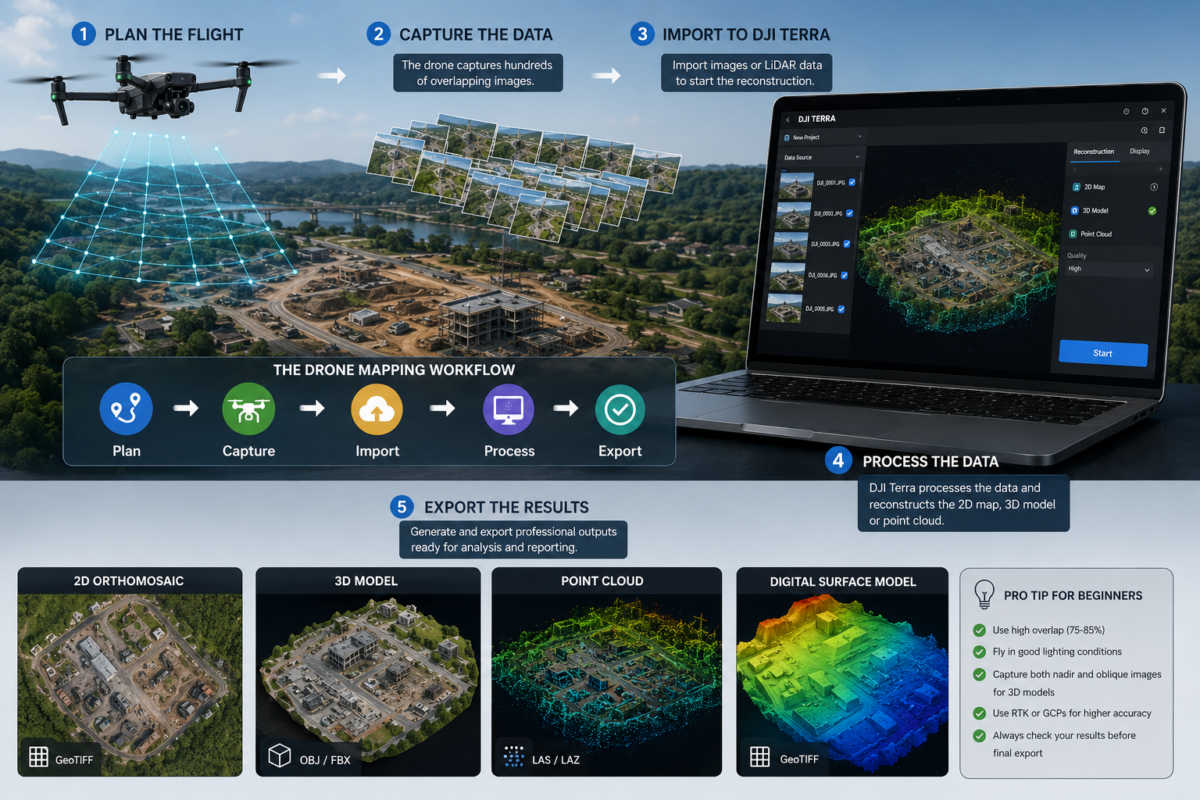
Drone mapping can seem complex at first. A drone flies over an area, captures hundreds or thousands of images, and somehow those images become an accurate 2D map, a 3D model, a point cloud or a digital reconstruction of the real world. For beginners, the process may look almost automatic, but professional drone mapping is actually based on a clear workflow: plan the flight, capture the data, process it in software, check the results and export the final deliverables.
DJI Terra is one of the most important software solutions for users working inside the DJI Enterprise ecosystem. It is designed to help drone pilots, surveyors, construction companies, inspection teams and mapping professionals transform aerial data into useful digital outputs. With DJI Terra, users can process visible-light images, create 2D maps, generate 3D models, work with DJI LiDAR data and explore advanced reconstruction technologies such as 3D Gaussian Splatting.
This beginner-friendly guide explains how drone mapping works with DJI Terra, from the first flight to the final 3D model. If you are new to drone mapping and want to understand the basic workflow before buying a DJI Terra license or starting your first project, this article will give you a practical overview.
What Is DJI Terra?
DJI Terra is DJI’s professional software for drone mapping, 2D reconstruction, 3D reconstruction, LiDAR point cloud processing and advanced model generation. It is designed to work closely with DJI drones and DJI Enterprise payloads, creating a more integrated workflow from data capture to final output.
In simple terms, DJI Terra takes the images or sensor data captured by a drone and uses them to reconstruct the real world in digital form. Depending on the project and license, the final output may be a high-resolution orthomosaic, a 3D model, a point cloud, a digital surface model, a LiDAR reconstruction or a photorealistic 3D visualization.
For beginners, the most important concept is this: DJI Terra does not simply “draw” a map. It analyzes overlapping drone images and calculates how they relate to each other in space. This process allows the software to build a digital version of the area captured during the flight.
How Drone Mapping Works: The Basic Concept
Drone mapping is based on image overlap. When a drone flies over an area, it captures many photos from slightly different positions. Each photo overlaps with the previous and next photos. DJI Terra uses this overlap to identify common points between images and reconstruct the scene.
This method is called photogrammetry. Photogrammetry uses photographs to measure and reconstruct real-world objects, terrain and structures. In drone mapping, photogrammetry is commonly used to create orthomosaics, 3D models and point clouds.
A basic drone mapping workflow usually includes five steps:
- Plan the flight mission
- Capture images or sensor data with the drone
- Import the data into DJI Terra
- Process the project into 2D or 3D outputs
- Check and export the final deliverables
Each step matters. Good results start in the field. If the drone flight is poorly planned, the software may not have enough information to create a reliable reconstruction. For this reason, beginners should learn the fundamentals of overlap, altitude, camera angle, lighting and ground control before expecting professional results.
Step 1: Planning the Drone Flight
Before creating a map or 3D model, you need to plan the flight. Flight planning determines how the drone will move, how high it will fly, how many images it will capture and how much overlap there will be between images.
For a basic 2D map, the drone usually flies a grid pattern while pointing the camera downward. This is known as a nadir flight. For a 3D model, the drone may also capture oblique images, where the camera is angled to see the sides of buildings, structures or terrain features.
Important flight planning parameters include:
- Altitude: Controls the ground resolution and area covered by each image.
- Forward overlap: The overlap between photos along the flight path.
- Side overlap: The overlap between adjacent flight lines.
- Camera angle: Nadir images are best for 2D maps; oblique images are useful for 3D models.
- Ground sample distance: The real-world size represented by each pixel in the image.
- Lighting conditions: Consistent lighting helps produce better image matching and cleaner outputs.
For beginners, a good rule is to use high overlap. Many mapping projects use around 75–85% forward overlap and 65–80% side overlap, depending on the terrain, camera and required output. More complex 3D projects may require even more coverage from different angles.
Step 2: Capturing the Images
Once the mission is planned, the drone captures the images automatically or semi-automatically. During the flight, it is important to maintain stable image quality. Blurry, underexposed or overexposed photos can reduce reconstruction quality.
For the best results, beginners should avoid flying in very poor lighting, strong wind or rapidly changing shadows. Moving objects such as cars, people, trees in strong wind or water surfaces can also create challenges for reconstruction.
When capturing data for a 3D model, it is important to photograph the subject from multiple directions. A building captured only from above may produce a good roof model but poor facades. To create a better 3D model, the drone should capture oblique images around the structure.
If accuracy is important, professional users may also use RTK, PPK or ground control points. These tools help improve the geospatial accuracy of the final outputs.
Step 3: Importing Data into DJI Terra
After the flight, the captured data is transferred from the drone or memory card to the computer. The images or LiDAR data can then be imported into DJI Terra.
At this stage, the user creates a new project and selects the appropriate reconstruction type. Depending on the data and goal, the project may be configured for 2D reconstruction, 3D reconstruction, LiDAR point cloud processing or other supported workflows.
For beginners, it is important to organize project folders carefully. Drone mapping projects can include hundreds or thousands of images, metadata files, logs, control point files and export outputs. A clear folder structure helps avoid confusion and makes future project review easier.
Step 4: Image Alignment and Reconstruction
Once the data is imported, DJI Terra begins the reconstruction process. The software analyzes the images, identifies matching points and estimates the position and orientation of each camera. This step is often called alignment or aerotriangulation.
After alignment, DJI Terra can generate different types of outputs. For a 2D map, it creates an orthomosaic by stitching and correcting the images into a single map-like view. For 3D reconstruction, it calculates depth and geometry to create a 3D representation of the scene.
This is where DJI Terra transforms raw drone photos into meaningful spatial data. The quality of the reconstruction depends on image overlap, sharpness, camera calibration, GPS or RTK information, scene texture and processing settings.
Step 5: Creating a 2D Map
A 2D map, often called an orthomosaic, is one of the most common drone mapping outputs. It looks like a large aerial photo, but it is geometrically corrected so that it can be used as a map.
Orthomosaics are useful for:
- Construction site documentation
- Land surveying
- Agricultural monitoring
- Road and infrastructure planning
- Quarry and mining site updates
- Environmental monitoring
- Public safety and emergency response
Unlike a normal drone photo, an orthomosaic is designed to reduce distortion and represent the ground more consistently. It can be used for measurements, visual analysis and comparison over time, depending on project accuracy and processing settings.
Step 6: Creating a 3D Model
A 3D model is a digital representation of a real-world object, terrain or site. In DJI Terra, 3D reconstruction can be used to create models of buildings, construction sites, industrial facilities, landscapes, monuments, quarries and infrastructure.
For beginners, the most important difference between 2D and 3D mapping is camera coverage. A 2D map mainly needs images from above. A 3D model needs images from multiple angles so that the software can understand the shape of the object or scene.
Good 3D reconstruction usually requires:
- High image overlap
- Oblique images
- Consistent lighting
- Sharp photos
- Multiple viewing angles
- Limited motion in the scene
If a building facade is not photographed, the software cannot reconstruct it properly. DJI Terra can only model what the drone captures. This is why flight planning is critical for 3D projects.
Step 7: Understanding Point Clouds
A point cloud is a collection of millions of points in 3D space. Each point represents a location on the surface of the object, terrain or structure being reconstructed. Point clouds can be generated from photogrammetry or from LiDAR sensors.
Point clouds are very useful for technical workflows because they represent spatial information in a dense and measurable form. Surveyors, engineers and inspection teams often use point clouds to analyze terrain, structures, volumes or infrastructure.
DJI Terra can process data collected by DJI LiDAR systems, which is especially important for applications such as forestry, corridor mapping, terrain modeling, utility inspection and complex environments where image-based reconstruction may not be enough.
Step 8: Checking Accuracy and Quality
After processing, beginners should not immediately deliver the output without checking it. Quality control is an essential part of drone mapping.
Important checks include:
- Are all images aligned correctly?
- Are there holes or distortions in the 3D model?
- Does the orthomosaic look sharp and continuous?
- Are there visible artifacts from moving objects, water or shadows?
- Are the coordinates correct?
- Do checkpoints match the expected accuracy?
- Is the output suitable for the intended use?
For professional surveying, accuracy should be validated with appropriate control points or checkpoints. A visually good model is not always a survey-grade model. Beginners should clearly understand the difference between visual quality and measurement accuracy.
Step 9: Exporting the Final Outputs
After processing and quality control, DJI Terra allows users to export different types of deliverables depending on the project and license. These outputs can then be used in GIS, CAD, inspection software, reports, presentations or client deliverables.
Common drone mapping outputs include:
- Orthomosaic maps
- 3D models
- Point clouds
- Digital surface models
- Contour lines
- Textured mesh models
- LiDAR outputs
- Visual reconstructions
The correct output depends on the client’s needs. A construction manager may need a visual progress map. A surveyor may need an accurate orthomosaic and point cloud. An inspection team may need a 3D model. A GIS team may need georeferenced raster files.
Drone Mapping Workflow Summary
| Workflow Step | What Happens | Why It Matters |
|---|---|---|
| Flight Planning | The drone mission is planned with altitude, overlap and camera settings | Good planning improves image coverage and reconstruction quality |
| Data Capture | The drone captures photos or sensor data over the project area | Sharp, consistent images are essential for accurate processing |
| Data Import | Images or LiDAR data are imported into DJI Terra | Correct organization avoids errors and simplifies processing |
| Reconstruction | DJI Terra aligns images and generates 2D or 3D outputs | This is where raw data becomes a map, model or point cloud |
| Quality Control | The user checks alignment, accuracy and visual quality | Professional deliverables require validation before export |
| Export | Final outputs are exported for GIS, CAD, reports or client use | The output must match the project’s technical requirements |
Best DJI Terra Use Cases for Beginners
1. Construction Site Mapping
Construction is one of the best starting points for drone mapping beginners. A drone can capture regular site updates, and DJI Terra can process the data into 2D maps or 3D models. These outputs help document progress, communicate with stakeholders and compare site conditions over time.
2. Land and Property Documentation
Drone mapping can be used to create clear visual records of land, properties, farms, industrial areas or development sites. Beginners can start with simple 2D mapping projects before moving into more advanced 3D reconstruction.
3. Basic 3D Building Models
A small building or isolated structure is a good beginner project for 3D modeling. By capturing both nadir and oblique images, users can learn how camera angles affect final reconstruction quality.
4. Agricultural Mapping
Agriculture is another useful area for drone mapping. Depending on the sensor and workflow, drone maps can help monitor field conditions, crop health, irrigation issues or changes over time.
5. Inspection and Documentation
Beginners can use DJI Terra to create visual records of roofs, structures, industrial sites or infrastructure. For advanced inspection, users should combine 3D outputs with detailed imagery and professional analysis.
Common Beginner Mistakes
Many drone mapping problems are caused by mistakes during capture rather than software processing. Beginners should avoid the following errors:
- Flying with too little overlap
- Using blurry or low-quality images
- Capturing only top-down images for a 3D model
- Flying in strong shadows or changing light conditions
- Ignoring coordinate system settings
- Expecting survey accuracy without RTK, PPK or control points
- Not checking outputs before delivery
- Using the wrong license for the required workflow
The best way to learn DJI Terra is to start with small, simple projects. Process a small area, review the results, identify mistakes and repeat the workflow. Drone mapping improves quickly when users understand how field capture affects software reconstruction.
Do You Need DJI Terra Standard or Flagship?
Beginners often ask whether they should start with DJI Terra Standard or DJI Terra Flagship. The answer depends on the type of work they want to do.
DJI Terra Standard may be suitable for many users who need regular 2D mapping and standard 3D reconstruction. It can be a practical starting point for drone service providers, construction teams and mapping users who do not need the highest-level features immediately.
DJI Terra Flagship is better suited for advanced users who need a more complete feature set, including more advanced reconstruction and professional workflows. It may be more appropriate for enterprise teams, inspection companies, LiDAR users and professionals working with complex 3D modeling or visualization.
Before purchasing, users should always check the latest license details and confirm that the selected version includes the features required for their workflow.
Final Verdict: Is DJI Terra Good for Beginners?
DJI Terra can be a good choice for beginners who want to enter professional drone mapping, especially if they already use DJI drones. Its biggest advantage is the integrated DJI workflow, which connects drone data capture with mapping, 3D reconstruction and LiDAR processing.
However, beginners should remember that software is only one part of the process. Good results depend on proper flight planning, high-quality images, correct overlap, suitable camera angles, accurate georeferencing and careful quality control.
If you are new to drone mapping, DJI Terra can help you understand the full workflow from flight to 3D model. Start with simple projects, learn how image capture affects reconstruction, and gradually move toward more advanced outputs such as point clouds, LiDAR processing and photorealistic 3D visualization.
Need help choosing the right DJI Terra license? Contact our team for professional guidance. We can help you compare DJI Terra Standard, Flagship, Agriculture, Cluster and DJI Modify options based on your drone model, project type and required outputs.
FAQ: DJI Terra for Beginners
What is DJI Terra used for?
DJI Terra is used for drone mapping, 2D reconstruction, 3D reconstruction, LiDAR point cloud processing and professional digital model generation from drone data.
Is DJI Terra suitable for beginners?
Yes, DJI Terra can be suitable for beginners, especially users already working with DJI drones. However, beginners should learn the basics of overlap, flight planning, camera angles, image quality and accuracy control.
How does DJI Terra create a 3D model?
DJI Terra analyzes overlapping drone images, identifies matching points and reconstructs the geometry of the scene. For better 3D models, the drone should capture the subject from multiple angles, including oblique images.
What is the difference between a 2D map and a 3D model?
A 2D map, or orthomosaic, is a corrected aerial view of the ground. A 3D model represents the shape and structure of an object, building, terrain or site in three dimensions.
Do I need ground control points with DJI Terra?
Ground control points are not always required for visual models, but they are important when high accuracy is needed. Professional survey projects should use proper control or checkpoint workflows.
Can DJI Terra process LiDAR data?
Yes, DJI Terra can process data collected by DJI LiDAR systems, making it useful for terrain mapping, forestry, corridor mapping, infrastructure inspection and other professional applications.
What drone mapping outputs can DJI Terra export?
Depending on the project and license, DJI Terra can generate outputs such as orthomosaics, 3D models, point clouds, digital surface models, contour lines and LiDAR reconstruction outputs.
Which DJI Terra license should beginners choose?
Beginners focused on regular 2D mapping and standard 3D reconstruction may start with DJI Terra Standard. Users who need advanced 3D, LiDAR, Gaussian Splatting or enterprise workflows should evaluate DJI Terra Flagship or other available packages.